"Budget" build

Sep 26, 2012
315
2
18
I have an old Howa that I picked up last year as a project gun, and I'm finally getting around to building it. I don't have everything planned out yet, but parts are starting to arrive. Here are the specs so far:

Action: Howa 1500 Long Action (have it)
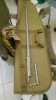
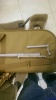
Barrel: Bartlein stainless, #3 contour, 1:8 twist (have it)
Chambering: 260 Remington
Muzzle brake: Defensive Edge .750 (have it)
Trigger: stock trigger, for now. (Have it)
Stock: original stock (have it)
Bottom "metal": Weatherby magazine conversion kit, polymer, with magazine (have it)
Bedding: metal-epoxy glass bedding
Finish: KG GunKote
Optics: Vortex Viper HS-T 4-16x44 (ordered)
Scope rail: Nightforce 20 MOA (have it)
Rings: Vortex (ordered)
Bipod: GG&G quick detachable XDS standard (ordered)

Comments and questions are welcome. Once the rifle is built, and while working up loads, I'll see if I can tune the trigger into something acceptable. It does have some adjustments, but when I set it previously, it still had more creep than I would like. If I can't stand it, I'll upgrade to a Rifle Basix or Timney.

I considered an aftermarket stock, but since this one came with a Bell and Carlson (not Hogue), I'll see how it works out. It doesn't have standard sling swivel studs, so I'll be adding in some method for mounting the bipod.

I like the idea of detachable mags, especially since the scope rail will make top loading more difficult, but I don't like the idea of paying $120-$250 for bottom metal and $75 for a mag. I wish the Weatherby conversion kit were more robust, but I think it will be strong enough, and it is certainly light!
 
It all sounds good Don!

Keep in mind that the current stock of Bartlein barrels at my secret place will be gone and then go on backorder for 6-9 months. I think I am going to pick up a 7mm barrel while they have stock. I have always wanted a .280 AI.

Because you have a long action you may want to consider a few other cartridges. All of which are worthy of long range accuracy...

6.5-06
6.5x284
.280 AI
.284 Win
 
I went ahead and bought one from your secret supplier, and canceled my Brux order. I got a notice from UPS saying my Bartlein is due to arrive tomorrow!
 
Re: "Budget" build


El Matavenados said:
I went ahead and bought one from your secret supplier, and canceled my Brux order. I got a notice from UPS saying my Bartlein is due to arrive tomorrow!
Don,
That's awesome! Looking forward to hearing more as you build it.
8)
 
El Matavenados said:
I went ahead and bought one from your secret supplier, and canceled my Brux order. I got a notice from UPS saying my Bartlein is due to arrive tomorrow!

Awesome job Don! You just purchased an amazing barrel. What barrel twist?
 
The twist is 1:8.

I also found a Nightforce 20 MOA scope mount rail on sale at Midway USA last night for $57.00, free shipping!
 
Re: "Budget" build

Had the barrel and brake mounted yesterday, and blasted. Pics to follow.

IMAG0097_zps7fr4uqxr.jpg

IMAG0096_zpskypojrqu.jpg
 

Attachments

  • IMAG0097_zps7fr4uqxr.jpg
    IMAG0097_zps7fr4uqxr.jpg
    167.6 KB · Views: 0
  • IMAG0096_zpskypojrqu.jpg
    IMAG0096_zpskypojrqu.jpg
    207.6 KB · Views: 0
To do:
Paint barrel, bolt, scope mount and rings (KG GunKote bake-on finish)
Inlet barrel channel
Glass/pillar bed
Paint stock
Re-assemble rifle
Lap scope rings, and mount scope
Load work-up rounds
Test fire!!!!!
 
The barrel and blasting work were done by Randall Rausch at AR15barrels.com (also 700barrels.com). NBK asked who is shooting his rifles. As it turns out, he has done a lot of work for a lot of the folks at the California Precision Rifle Club (www.caprc.com). He's located in Van Nuys (traffic SUCKED!!!), but it was nice that he was able to get me in for an appointment within a week of asking. He did the work while I waited, and let me stand there watching, learning, asking dumb questions. His shop is well-equipped- 2 lathes, full-sized mill, 25-ton hydraulic press, blasting cabinet, Parkerizing setup, and on and on. He does metric work too, at no extra charge. That's good, because Howas are metric. I'll say this: it's a good thing he has that press, because the standard barrel vise/wrench combo wasn't enough to break the stock barrel free. He had to put the whole setup in the press with about 6 tons of pressure, put a 3-foot breaker pipe on the wrench, and put almost all of his weight on it before it broke loose.

His rates are VERY reasonable (see his websites). Of course, the proof is in the pudding, so if this rifle shoots as well as I hope it will, then I hope to have him do some more work in the future.
 
Re: "Budget" build

Don, thanks for taking the time to post. Amazing to watch it take shape.
8)
 
Barrel, action, and bolt are now painted. This took a while because I needed to get some practice runs in on some AR lowers and other pieces before I unleashed the airbrush on my new baby! The bolt is reassembled. I blasted the finish off of the stock, because it had some unsightly wear and scrapes in the finish, and the finish was flaking off in places. Stock inletting is 90% done.

Things left to do:
Finish the stock inletting
Bed the action to the stock
Bed the "bottom metal" (actually polymer) to the stock
Reassemble the small bits and pieces back onto the action
Paint the stock
Paint scope rail, scope rings, etc.
Put action back in stock, mount rail and rings, and lap the rings
Mount scope
load workup test loads
Shoot!
 
I'm getting close now! All that remains to be done is:
Finish up the paint on the stock
Clean out the action screw holes in the stock (quick drill job)
Mount the scope and boresight it
Clean the barrel
I might adjust the trigger and see if I can get rid of the creep

If I can get all of that done this evening, and the weather isn't too bad tomorrow, I hope to test fire it in the AM! Workup ammo is loaded and ready. Some info on my workup ammo:

140gr Berger VLD (Note: these have been treated with Hexagonal Boron Nitride- see here for details: http://www.davidtubb.com/tubb-accuracy-reloading/bn-boron-coating)
CCI BR2 primer
H4350 powder, charges from 37 to 42gr

A note on the powder charge: 42 grains doesn't fill the case, so if pressures are ok, I have room to play with. The gunsmith recommended loading to 2825-2850, which he described as a sweet spot for this barrel/chamber, which he has done on several other rifles. Barrel length is 26", so that should help get the velocities up there.

Many people like to shoot their VLD bullets jammed in the lands, and for many years, Berger recommended this as well. However, people using rifles that prevent loading cartridges to that length have reportedly been having success by finding a sweet spot that allows them to "jump" the bullet to the lands, and shoot very well, as long as they can find that sweet spot. Here's an article from Berger describing the process: http://www.bergerbullets.com/getting-the-best-precision-and-accuracy-from-vld-bullets-in-your-rifle
 
Results at last! But before I get to the good stuff, a few notes on the build.

I painted the rifle with KG Gunkote (not the aerosol version from Brownell's, but the liquid straight from the manufacturer). They have a bake-on finish and an air-cure finish. I bought the bake-on product for those parts that could stand the 325 degree baking temperatures (action/barrel, bolt, scope rings, etc.), and the air-cure for the stock. The bake-on product isn't as wear-resistant (according to all reputable sources I've read) as Cerakote, but it's better than Duracoat, and cheaper than both. Metals are prepared by degreasing with strong chemicals (acetone, MEK, etc.), media blasting, and degreasing again. I made an oven out of an old locker, some insulation board, and the guts from an oven I got for free off Craigslist (people list them for free quite regularly). My brother helped me get it working, and it does the job. I used a lot of the bake-on paint in practice on some AR lower receivers, and I'm glad I did. I've never used an airbrush before. I tried at first to use an HVLP finish gun to apply the coating, but I didn't have it adjusted properly, and wasted a lot of paint. Airbrush is easier to adjust and control, and does better in all the nooks and crannies of a rifle action. The stock proved more difficult, as the air-cure paint dries VERY quickly. So much so that it gums up the airbrush quickly. Word to the wise: keep a cup of water handy, and wash your airbrush out at the first sign of clogging, and immediately after applying paint. It's water-soluble until it starts drying. You also have to prep your stock well, completely stripping it of any oils, waxes, release agents, etc., and media blasting it as well. When I emailed the company about the troubles I had, they sent an initial reply very quickly, but have subsequently ignored my emails and calls. Therefore, I can't recommend the air-cure product. The bake-on, with proper prep and application, seems solid.

After painting the action but before painting the stock, I bedded this rifle with JB Weld, using Johnson Paste Wax as a release agent. It's not a complicated process, and there are many tutorials online about how to do so. If you've never seen the difference that bedding your rifle can make, you should check it out. I have a Ruger M77 MkII in .30-06 that didn't shoot better than 1.5" (and usually more like 2") at 100 yards, no matter what I did, until I bedded it. It was my first rifle, and I tried for years to get it to shoot. After bedding it, I nearly cried when I saw a group smaller than 1". I won't go into detail on this process, but I like the "stress-free" method of bedding. Not that I have experience to support my opinion- the concept just seems sound to me. There are articles and videos describing the process and why it may be better, so check them out.
IMAG0111_zpslb4kp5hd.jpg

There were some worn and scraped spots on the stock, so I blasted the finish off before painting:
IMAG0108_zps791lofq6.jpg

IMAG0109_zpsuhweok5e.jpg

Now on to the good stuff! I finished the build on Friday evening, and was able to get out and shoot it on Saturday and Sunday afternoons. Here's the finished product:
IMAG0118_zpsxximb8tn.jpg

I did workup loads from 37 to 42.5 grains of H4350. There was a significant accuracy node between 37.5 and 38.5 grains. All test loads were jammed into the lands. Pressure signs developed at 42 and 42.5 grains (ejector swipes). An interesting note: these were loaded with CCI Benchrest 2 large rifle primers, and they were cratering inconsistently and even severely at the lowest pressures. That bothered me, but there were no other pressure signs until I reached the highest powder charges. The best group of 3 rounds measured .382 from center to center (obtained by measuring the group, then subtracting the bullet diameter):
IMAG0117_zpsyopzbiyz.jpg

I think I can improve on this, and will be doing more load development in the next few weeks to see if I can get it dialed in better. NBK sent me a couple links on ladder testing which have my wheels turning- a lot to think about in these!
https://sierrabullets.wordpress.com/2014/07/03/long-range-load-development/
http://www.6mmbr.com/laddertest.html

A few people have asked me about the bipod. It's a GG&G Standard HDX, I think it's called. It's rock-solid, but they have an even stouter version if you happen to have an M240 laying around. My stock doesn't have swivel studs, and though it would be easy to add them, I decided on a quick-release picatinny style mount. I bought a light, short rail section made by Magpul, shortened it even further on my mill, milled a flat spot in the forearm of the stock, drilled some holes, and screwed it in place. My stock has hollows in it to make it ligher, and this made it very simple to use the nuts that came with the rail. I did have to pick up a couple longer screws from Napa though. I think that cost me a quarter. Anyway, I REALLY like the quick release. The bipod was pricey, but I think it will be a solid, dependable unit for a long time. Harris makes extremely popular bipods, but they don't have one that mounts directly to a picatinny rail. You can purchase adapters for $40, but that adds weight. On their swiveling units (which you really need for long range shooting), you also need to buy a lever to replace the nut that adjusts the swiveling tension- another $15-$40. By the time you add all that, you're rapidly approaching the cost of the GG&G or Atlas, or other high-end bipod. Why doesn't Harris just build one with these features? With the AR15 and AR10 craze going on right now, I think they would have plenty of takers.

Ok, that brings today's novel to a close!
 
Re: "Budget" build

Don, that's amazing. Beautiful rifle and great groups. Congrats dude!
 
It been awesome to see this build come together Don. And it may be the quickest build I have ever seen. Strong work on your part!

Is it possible to get a build budget breakdown? This is an excellent rig built at a pretty modest price as far as long range rifles go. Cant wait to see the continued results from your load testing! Considering these were your first test loads, I would say you are well on your way to some bug-hole size groups.

Thank a bunch for sharing!
 
Thanks, guys.

NBK, ya know how you spend money on a project, and you think the total is one amount, but in reality it's way out of the ballpark? Turns out that I was more than a bit off in what I told you on Saturday. Here's a breakdown of what some of the items cost:
Bartlein barrel $371
Defensive Edge brake $80
Scope, rings, caps, bubble level $594
bipod $198
paint $20
detachable mag assembly $97
Nightforce 20 MOA scope mount $57
Donor rifle $400
JB Weld $7
cheek rest $35
case $115
Gunsmith fees (barrel fitting with threaded muzzle, blast etc.) $330

Total $2303

Of course, this doesn't include dies or components for loading, chemicals (for degreasing, etc.).
 
El Matavenados said:
Thanks, guys.

NBK, ya know how you spend money on a project, and you think the total is one amount, but in reality it's way out of the ballpark? Turns out that I was more than a bit off in what I told you on Saturday.

Ain't that the truth Don. None-the-less you have a lot of rifle for the money. Great job! And in world record time!
 
Re: "Budget" build

Yeah Don that's astonishing how fast you finished it.
 

About us

  • SCHoutdoors was created in January of 2011 by a few people who love the outdoors. The main goal is still the same – bring people together who enjoy the outdoors and share their knowledge and experience.
    Outdoors in the West, Hunting gear reviews, Big Game, Small Game, Upland Game, Waterfowl, Varmint, Bow Hunting, long Range Rifles, Reloading, Taxidermy, Salt WaterFishing, Freshwater Fishing, Buy-Sell-Trade on Classifieds and Cooking/Recipes
    All things outdoors…come join us, learn, contribute and become part of the SCHoutdoors community.

Quick Navigation

User Menu