Source - Sierra
Case Inspection
Case inspection is a vital first step in the reloading process. Upon being fired, a cartridge case is subjected to a tremendous amount of stress. It swells violently out to the chamber walls for an instant, before the natural resilience of the brass allows it to spring back to dimensions that are now larger than its original unfired dimensions. This causes work hardening, which can eventually lead to cracking or splitting. Careful inspection will allow the timely retirement of the brass before these catastrophic failures occur. Primer pockets can be expanded and deformed. In addition, the cartridge undergoes a series of events that may cause damage, unrelated to the actual firing. The feeding cycle in an autoloader for example, either rifle or handgun, can cause damage to cases. Extraction is yet another violent phase in an autoloaders operation that can also damage rims badly enough to retire the case. The following paragraphs will list the primary areas that must be inspected, and what to look for.
Necks
Case necks, in either bottle-necked or straight-walled designs, are a good place to begin the inspection process. Examine the case neck/mouth area for any sign of cracking. Resizing bottle-necked cases works the neck area somewhat more than the remainder of the case due to the action of the expander ball. As a result, case necks are frequently the first area of a case to fail. Inspect the neck area between the case mouth and shoulder for any signs of cracking or pinholing. If the cases are OK, this is a good time to clean the necks with a case neck brush to remove any carbon or powder residue. This will ease the passage of the expander ball considerably, resulting in a more concentric resizing operation. On straight-wall cases, an expander plug is used to bell the case mouth just enough to allow seating of the bullet without shaving or galling. This belling creates extra stress around the case mouth. This is one of the most common areas of case failure, usually appearing as cracks or splits extending down the side of the case body. Inspect this area closely for any signs of failure, and discard any cases that show cracking or splitting.
Case neck splits caused by an excessive number of reloadings. While this type of loss can be reduced by minimizing the working of the brass, this is natural attrition, and is a primary reason for the retirement of cases.
Primer Pockets
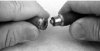
A primer pocket uniformer is used to square the pockets and cut them all to a uniform depth. This hand-held carbide cutter is made by Whitetail Design and Engineering.
Primer pockets should be inspected twice; first when the fired cases are examined, and again after the case has been resized and decapped. Although they will very rarely show any signs of overt failure, the pocket should be monitored closely nonetheless. When inspecting the fired case with the spent primer still in place, note the condition of the fired primer. Is it badly flattened or cratered? Did it leak any gas in the last firing? Check the small radius at the mouth of the pocket for signs of leakage, which will appear as sooty smudge on the case head. This may indicate a point at which the pocket has allowed gas to escape, due to an excessively hot load or some irregularity in the primer pocket. Regardless of the cause, once such a leak has occurred the case is finished.
Destroy it, and throw it away. After the spent primer has been removed, usually during the sizing operation, re-examine the primer pocket. Inspect the web area, and the flash hole for any burrs or obstructions. These can usually be easily removed, and the case returned to service.
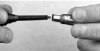
A flash hole deburring tool, such as this one from Sinclair International, serves to remove any burrs or irregular surfaces around the flash hole. These burrs can affect proper ignition, which in turn can reduce accuracy.
Monitoring primer pocket condition is an ongoing operation, conducted at several points along the reloading process. For example, when repriming the case, pay particular attention to how easily the new primer seats. If the primer seats too easily, the pocket has probably been stretched or expanded, rendering the case useless for further reloading. In extreme cases, this may even result in a dangerous condition, allowing gas to escape through the primer pocket and back into the action. Keep a critical eye on the condition of this vital area of your brass, and destroy and discard any which become suspect.
In operation, the cutter is inserted into the flash hole, where a quick turn will remove any burrs left by the manufacturing process.
A serious pressure problem! This case has had its primer pocket expanded badly enough to allow gas to escape back into the action, posing a serious threat to the shooter. Always work up to maximum loads slowly and carefully.
Head separations will appear as a crack around the circumference of the case body, just slightlye ahead of the belt, extractor groove, or rim, depending on the case type. This may appear as either an actual crack through which powder leaked, or a bright ring indicating a point at which the brass has thinned. During the resizing operation, some marking of the brass by the die is inevitable, and is frequently mistaken for partial head separation. Closely inspect the area approximately 1/8 to 1/2-inch ahead of the extractor groove, under a magnifying glass if necessary, to determine whether these are marks from sizing or are actually the faint cracking associated with a pending head separation. Another useful method for checking incipient separation is to use a sharpened paper clip. To do this, use a small file to sharpen one end of a straightened paper clip. Bend the end to 90 degrees approximately 1/8-inch from the sharpened end. The paper clip is then used as a “feeler gauge” to check the interior case walls. Insert the bent end of the paper clip into the case mouth, and drag the sharpened point along the interior case walls. Any thinning or cracking can be readily felt as the point dips across the damaged area.
In extreme cases, the head may actually separate from the case body, leaving the forward portion stuck tightly in the chamber. This is an extremely serious and potentially dangerous condition that may result in serious injury or the destruction of a fine firearm. This is normally caused by a condition related to “headspace,” or more accurately, excessive headspace.
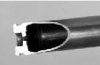
An incipient head separation, as seen from inside the case. The damaged area can be seen as an indentation, or thinned ring just ahead of the web.
Headspace may be defined as the measurement from the closed breech face to the portion of the chamber that stops forward movement of the cartridge when the action is fully closed. When a cartridge having insufficient headspace is chambered, the action will be blocked from fully closing. Conversely, when a condition of excessive headspace exists, there will be some amount of linear “play” of the cartridge within the chamber when the action is closed. As a practical matter, some amount of headspace must be present to assure reliable operation and chambering. In most modern ammunition, this will be something on the order of four to six thousandths (.004″ to .006″) of an inch.
The manner in which this play is controlled is determined by case configuration. On a bottle necked rimless cartridge like the .30-06, headspace is measured from a point located midway down the shoulder called the “datum line.” In other words, this is the point of the cartridge that prevents it from going deeper into the chamber. Rimmed cases, such as the .30-30 or .38 Special, are stopped by the front face of the rim itself. As a result, their headspace dimension will be approximately the same as the rim thickness. Belted cases such as the 7mm Remington Magnum, are measured from the forward face of the belt, exactly as if the belt was a miniature rim. On straight wall rimless cases such as the .45 ACP, headspace is normally controlled by the case mouth resting on a corresponding ledge within the chamber.
The problems associated with excessive headspace are manifested upon firing. When a gun is fired, the blow of the firing pin or striker drives the cartridge forward into the chamber until it stops against some solid point.
This will be the datum line in a rimless cartridge, the front of the belt on a belted case, or the ledge formed by the case mouth in a straight wall rimless cartridge. As pressure within the cartridge builds, it forces the case outward against the chamber walls, gripping them tightly. As the pressure continues to rise, the case will stretch to fill the chamber, including the area between the head of the case and the face of the bolt or breech face. The rear portion of the case actually moves rearward a few thousandths of an inch, while the forward portion adheres to the chamber walls. This results in a thinned and weakened area where the case stretched, usually just ahead of the belt, extractor groove, or rim, depending on case configuration. As the pressure subsides, the natural resiliency of the brass causes it to contract slightly, releasing its grip on the chamber wall and allowing it to be easily extracted from the chamber. This entire process takes place in a fraction of a second, but if the headspace is excessive, the damage is already done.
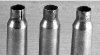
We have a headspace problem! These three cases show partial head separation, as either a crack or bright ring which appears just ahead of the web. Handloaders can adjust their resizing dies to eliminate this condition.
As you can see, the true headspace is actually a combination of measurements between the ammunition and the firearm. As such, it is entirely possible to have headspace problems in a firearm that has correct headspace, if the ammunition is improperly resized. It is also possible to experience these same problems with ammunition having the proper headspace dimensions, if the chamber of the firearm is out of specifications. Headspace problems can frequently be corrected by proper die adjustment, but any suspect ammunition or firearms should be checked by a competent gunsmith. While the condition may be corrected or compensated for, cases that have developed signs of incipient head separations must be destroyed and scrapped at once.
Headspace problems in general and head separations in particular, are most commonly associated with bottle-necked cartridges, but we have seen examples of straight-walled pistol cases giving complete head separation. Take the time to check your die adjustment, and closely monitor the condition of your brass. In addition to checking cases carefully after firing, we strongly recommend using case gauges when setting up or adjusting dies.
Surface Defects
Surface defects include any and all defects on the exterior of the cartridge case. These may range from slight scratches, to severe dents along the case body, shoulder or neck. Small dings and scratches are inevitable (especially when using semi-autos) and of no great consequence. Smaller dents will be ironed out during the resizing operation and small scratches (those too small to hang or catch a thumbnail on) won’t affect performance. Deep scratches may weaken the case, and are sufficient cause to discard it. A quick visual observation should be sufficient to segregate these, and any other potential problem cases for evaluation on an individual basis. Those that show signs of a potential problem should be destroyed immediately.
Rim Condition
Case rims rarely present any kind of a safety problem, but damaged or deformed rims can have a major effect on reliability. A quick check for signs of peening, out-of-squareness, or burrs will usually turn up anything which could develop into a trouble spot. A gun’s tendency for rim problems is largely dependent on the type of firearm being discussed. Revolvers are naturally very easy on case rims, and will rarely create any problems. Autoloaders on the other hand,
can be brutal on case rims. Rims can be damaged during the often violent feeding cycle, and/or in the equally rough extraction phase. Due to the incredibly high speeds of the bolt or slide of the typical autoloader, fixed ejectors will often ding or peen the case rim as it is ejected. This is especially true in intense loadings, which operate the action in a more violent manner than do milder loads. Difficulty experienced in inserting a case into a shell holder during the reloading process is a good indicator that there is a rim problem. A quick visual inspection is usually sufficient to locate problem cases, which may then be discarded.
Source - Sierra
Case Inspection
Case inspection is a vital first step in the reloading process. Upon being fired, a cartridge case is subjected to a tremendous amount of stress. It swells violently out to the chamber walls for an instant, before the natural resilience of the brass allows it to spring back to dimensions that are now larger than its original unfired dimensions. This causes work hardening, which can eventually lead to cracking or splitting. Careful inspection will allow the timely retirement of the brass before these catastrophic failures occur. Primer pockets can be expanded and deformed. In addition, the cartridge undergoes a series of events that may cause damage, unrelated to the actual firing. The feeding cycle in an autoloader for example, either rifle or handgun, can cause damage to cases. Extraction is yet another violent phase in an autoloaders operation that can also damage rims badly enough to retire the case. The following paragraphs will list the primary areas that must be inspected, and what to look for.
Necks
Case necks, in either bottle-necked or straight-walled designs, are a good place to begin the inspection process. Examine the case neck/mouth area for any sign of cracking. Resizing bottle-necked cases works the neck area somewhat more than the remainder of the case due to the action of the expander ball. As a result, case necks are frequently the first area of a case to fail. Inspect the neck area between the case mouth and shoulder for any signs of cracking or pinholing. If the cases are OK, this is a good time to clean the necks with a case neck brush to remove any carbon or powder residue. This will ease the passage of the expander ball considerably, resulting in a more concentric resizing operation. On straight-wall cases, an expander plug is used to bell the case mouth just enough to allow seating of the bullet without shaving or galling. This belling creates extra stress around the case mouth. This is one of the most common areas of case failure, usually appearing as cracks or splits extending down the side of the case body. Inspect this area closely for any signs of failure, and discard any cases that show cracking or splitting.
Case neck splits caused by an excessive number of reloadings. While this type of loss can be reduced by minimizing the working of the brass, this is natural attrition, and is a primary reason for the retirement of cases.
Primer Pockets
A primer pocket uniformer is used to square the pockets and cut them all to a uniform depth. This hand-held carbide cutter is made by Whitetail Design and Engineering.
Primer pockets should be inspected twice; first when the fired cases are examined, and again after the case has been resized and decapped. Although they will very rarely show any signs of overt failure, the pocket should be monitored closely nonetheless. When inspecting the fired case with the spent primer still in place, note the condition of the fired primer. Is it badly flattened or cratered? Did it leak any gas in the last firing? Check the small radius at the mouth of the pocket for signs of leakage, which will appear as sooty smudge on the case head. This may indicate a point at which the pocket has allowed gas to escape, due to an excessively hot load or some irregularity in the primer pocket. Regardless of the cause, once such a leak has occurred the case is finished.
Destroy it, and throw it away. After the spent primer has been removed, usually during the sizing operation, re-examine the primer pocket. Inspect the web area, and the flash hole for any burrs or obstructions. These can usually be easily removed, and the case returned to service.
A flash hole deburring tool, such as this one from Sinclair International, serves to remove any burrs or irregular surfaces around the flash hole. These burrs can affect proper ignition, which in turn can reduce accuracy.
Monitoring primer pocket condition is an ongoing operation, conducted at several points along the reloading process. For example, when repriming the case, pay particular attention to how easily the new primer seats. If the primer seats too easily, the pocket has probably been stretched or expanded, rendering the case useless for further reloading. In extreme cases, this may even result in a dangerous condition, allowing gas to escape through the primer pocket and back into the action. Keep a critical eye on the condition of this vital area of your brass, and destroy and discard any which become suspect.
In operation, the cutter is inserted into the flash hole, where a quick turn will remove any burrs left by the manufacturing process.
A serious pressure problem! This case has had its primer pocket expanded badly enough to allow gas to escape back into the action, posing a serious threat to the shooter. Always work up to maximum loads slowly and carefully.
Head separations will appear as a crack around the circumference of the case body, just slightlye ahead of the belt, extractor groove, or rim, depending on the case type. This may appear as either an actual crack through which powder leaked, or a bright ring indicating a point at which the brass has thinned. During the resizing operation, some marking of the brass by the die is inevitable, and is frequently mistaken for partial head separation. Closely inspect the area approximately 1/8 to 1/2-inch ahead of the extractor groove, under a magnifying glass if necessary, to determine whether these are marks from sizing or are actually the faint cracking associated with a pending head separation. Another useful method for checking incipient separation is to use a sharpened paper clip. To do this, use a small file to sharpen one end of a straightened paper clip. Bend the end to 90 degrees approximately 1/8-inch from the sharpened end. The paper clip is then used as a “feeler gauge” to check the interior case walls. Insert the bent end of the paper clip into the case mouth, and drag the sharpened point along the interior case walls. Any thinning or cracking can be readily felt as the point dips across the damaged area.
In extreme cases, the head may actually separate from the case body, leaving the forward portion stuck tightly in the chamber. This is an extremely serious and potentially dangerous condition that may result in serious injury or the destruction of a fine firearm. This is normally caused by a condition related to “headspace,” or more accurately, excessive headspace.
An incipient head separation, as seen from inside the case. The damaged area can be seen as an indentation, or thinned ring just ahead of the web.
Headspace may be defined as the measurement from the closed breech face to the portion of the chamber that stops forward movement of the cartridge when the action is fully closed. When a cartridge having insufficient headspace is chambered, the action will be blocked from fully closing. Conversely, when a condition of excessive headspace exists, there will be some amount of linear “play” of the cartridge within the chamber when the action is closed. As a practical matter, some amount of headspace must be present to assure reliable operation and chambering. In most modern ammunition, this will be something on the order of four to six thousandths (.004″ to .006″) of an inch.
The manner in which this play is controlled is determined by case configuration. On a bottle necked rimless cartridge like the .30-06, headspace is measured from a point located midway down the shoulder called the “datum line.” In other words, this is the point of the cartridge that prevents it from going deeper into the chamber. Rimmed cases, such as the .30-30 or .38 Special, are stopped by the front face of the rim itself. As a result, their headspace dimension will be approximately the same as the rim thickness. Belted cases such as the 7mm Remington Magnum, are measured from the forward face of the belt, exactly as if the belt was a miniature rim. On straight wall rimless cases such as the .45 ACP, headspace is normally controlled by the case mouth resting on a corresponding ledge within the chamber.
The problems associated with excessive headspace are manifested upon firing. When a gun is fired, the blow of the firing pin or striker drives the cartridge forward into the chamber until it stops against some solid point.
This will be the datum line in a rimless cartridge, the front of the belt on a belted case, or the ledge formed by the case mouth in a straight wall rimless cartridge. As pressure within the cartridge builds, it forces the case outward against the chamber walls, gripping them tightly. As the pressure continues to rise, the case will stretch to fill the chamber, including the area between the head of the case and the face of the bolt or breech face. The rear portion of the case actually moves rearward a few thousandths of an inch, while the forward portion adheres to the chamber walls. This results in a thinned and weakened area where the case stretched, usually just ahead of the belt, extractor groove, or rim, depending on case configuration. As the pressure subsides, the natural resiliency of the brass causes it to contract slightly, releasing its grip on the chamber wall and allowing it to be easily extracted from the chamber. This entire process takes place in a fraction of a second, but if the headspace is excessive, the damage is already done.
We have a headspace problem! These three cases show partial head separation, as either a crack or bright ring which appears just ahead of the web. Handloaders can adjust their resizing dies to eliminate this condition.
As you can see, the true headspace is actually a combination of measurements between the ammunition and the firearm. As such, it is entirely possible to have headspace problems in a firearm that has correct headspace, if the ammunition is improperly resized. It is also possible to experience these same problems with ammunition having the proper headspace dimensions, if the chamber of the firearm is out of specifications. Headspace problems can frequently be corrected by proper die adjustment, but any suspect ammunition or firearms should be checked by a competent gunsmith. While the condition may be corrected or compensated for, cases that have developed signs of incipient head separations must be destroyed and scrapped at once.
Headspace problems in general and head separations in particular, are most commonly associated with bottle-necked cartridges, but we have seen examples of straight-walled pistol cases giving complete head separation. Take the time to check your die adjustment, and closely monitor the condition of your brass. In addition to checking cases carefully after firing, we strongly recommend using case gauges when setting up or adjusting dies.
Surface Defects
Surface defects include any and all defects on the exterior of the cartridge case. These may range from slight scratches, to severe dents along the case body, shoulder or neck. Small dings and scratches are inevitable (especially when using semi-autos) and of no great consequence. Smaller dents will be ironed out during the resizing operation and small scratches (those too small to hang or catch a thumbnail on) won’t affect performance. Deep scratches may weaken the case, and are sufficient cause to discard it. A quick visual observation should be sufficient to segregate these, and any other potential problem cases for evaluation on an individual basis. Those that show signs of a potential problem should be destroyed immediately.
Rim Condition
Case rims rarely present any kind of a safety problem, but damaged or deformed rims can have a major effect on reliability. A quick check for signs of peening, out-of-squareness, or burrs will usually turn up anything which could develop into a trouble spot. A gun’s tendency for rim problems is largely dependent on the type of firearm being discussed. Revolvers are naturally very easy on case rims, and will rarely create any problems. Autoloaders on the other hand,
can be brutal on case rims. Rims can be damaged during the often violent feeding cycle, and/or in the equally rough extraction phase. Due to the incredibly high speeds of the bolt or slide of the typical autoloader, fixed ejectors will often ding or peen the case rim as it is ejected. This is especially true in intense loadings, which operate the action in a more violent manner than do milder loads. Difficulty experienced in inserting a case into a shell holder during the reloading process is a good indicator that there is a rim problem. A quick visual inspection is usually sufficient to locate problem cases, which may then be discarded.
Source - Sierra