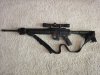
As requested, here is my new AR, Serial number SDCVC 007, aka "Lucky". The receiver was built by JD Machine here in San Diego. The lower parts kit came from Palmetto State Armory and the upper is an ArmaLite assembly purchased from Ammo Brothers at the Crossroads of the West Gun Show in Del Mar last month. I was going back and forth about what glass to put on. I originally put on a Bushnell that I had in my safe, but a minor problem precluded that idea. I contacted John at Fine Firearms in La Mesa and he HIGHLY recommended a Leupold VX-1 2-7 x 33 scope as the one to put on "Lucky". I had a choice of a 2-7 or 3-9. I have always used a higher powered scope, but feel that the low-end is more important than the high end for hunting coyotes so I opted for the 2-7. A quick trip to the range got it all sighted in and ready for the club hunt this weekend down in El Centro. Come on "Lucky". Strut your stuff!


You are using an out of date browser. It may not display this or other websites correctly.
You should upgrade or use an alternative browser.
You should upgrade or use an alternative browser.
Here's "Lucky"
- Thread starter White Smoke
- Start date
S
scohen
Guest
That's a nice looking rig; thumbs up for buying at local business and yea we want to see some pictures by Monday 8)
Papi
Papi
One last note...I was unhappy with the Palmetto trigger. It was barely OK. It just had a stiff feel...not smooth at all. I just installed a DPMS two-stage in it ($85.00 plus tax and free shipping) and the feel is about 1000% better. There is some slack you have to first take up until you hit the "wall". Then it's a crisp, clean break at about 3.5 to 4-pounds. Going to take it to the range on Monday and finish sighting it in at 150. The new trigger should be a big help in getting decent groups.
Got to the range today. It was a little windy but no rain. Shot a beautiful five-shot, 3/4" group. This sure works for me. The new trigger is really sweet
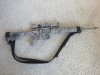
White Smoke said:After wrapping and unwrapping and re-wrapping "Lucky" with camo tape many times, I finally said, "Screw it!" and just painted it. After all, it's a HUNTING rifle. Anyway, here it is as it now looks.
Looks good man any certain kind of paint?
Going out Thursday, the last day before the club's self-imposed moratorium during pupping season. All the guys on TV seem to get their animal on the last day and hour of their hunt. Maybe I'll be lucky too.
I used Rust-Oleum camouflage spray paint, although there are other brands out there that are just as good. I first wiped it down with alcohol to get rid of any grease and oil and then sprayed a base coat of tan. Once the tan had dried, I sprayed four-inch bands of dark brown so it had alternating four-inch bands of dark and light browns. You then find or make some sort of a stencil to act as a spray shield. I have some miniature palm trees in my yard and used the narrow palm fronds as my stencil. You lay the palm fronds on the rifle and spray sections lightly with the opposite color of paint your stencil is lying on. In other words, hold the stencil in front of a light tan section and spray lightly with the dark brown paint. Then move to a dark brown section and spray with the light tan paint. That gives a medium colored result. If you want a light pattern for the desert, spray the entire rifle with dark brown first and then spray it only with the light tan. That gives a light background with dark patterning. Do the reverse for a darker pattern. After you get the basic two-color pattern on the rifle, you can add a few areas of camo green and/or a flat textured white (don't use too much white...just a little) to give it some depth. Try it first on a piece of cardboard to see how much you want to dust in to get the patterning or effect you want. You really can't screw it up. If it come out too light, just go back over it with some more dark or vice versa. As I said, I used miniature palm fronds for my stencil but you can use anything that will give a pattern. Pine tree branches are good (flatten the needles out first using a board with a weight on top) or any small-leafed tree or vines.
I used Rust-Oleum camouflage spray paint, although there are other brands out there that are just as good. I first wiped it down with alcohol to get rid of any grease and oil and then sprayed a base coat of tan. Once the tan had dried, I sprayed four-inch bands of dark brown so it had alternating four-inch bands of dark and light browns. You then find or make some sort of a stencil to act as a spray shield. I have some miniature palm trees in my yard and used the narrow palm fronds as my stencil. You lay the palm fronds on the rifle and spray sections lightly with the opposite color of paint your stencil is lying on. In other words, hold the stencil in front of a light tan section and spray lightly with the dark brown paint. Then move to a dark brown section and spray with the light tan paint. That gives a medium colored result. If you want a light pattern for the desert, spray the entire rifle with dark brown first and then spray it only with the light tan. That gives a light background with dark patterning. Do the reverse for a darker pattern. After you get the basic two-color pattern on the rifle, you can add a few areas of camo green and/or a flat textured white (don't use too much white...just a little) to give it some depth. Try it first on a piece of cardboard to see how much you want to dust in to get the patterning or effect you want. You really can't screw it up. If it come out too light, just go back over it with some more dark or vice versa. As I said, I used miniature palm fronds for my stencil but you can use anything that will give a pattern. Pine tree branches are good (flatten the needles out first using a board with a weight on top) or any small-leafed tree or vines.
I didn't mention it, but it's obvious that, after you wipe the rifle down with the alcohol, you use blue tape to cover up anything you don't want painted, like scope lenses, rifle sights, "SAFE" and "FIRE" markings, etc.